ここでは、
Spring入門コンテンツをインポートする方法と学習した入門コンテンツについて、紹介します。
学習した入門コンテンツ
・フォーム送信処理 - Handling Form Submission動作環境

以下の環境に入門コンテンツをインポートしました。
・Windows10 64bit
・Eclipse 2018-12(Eclipse 4.10)
・Java 8
・Spring Boot 2.1.3(Spring Tool Suite 4)
※下記の記事で構築した開発環境を利用
入門コンテンツのインポート
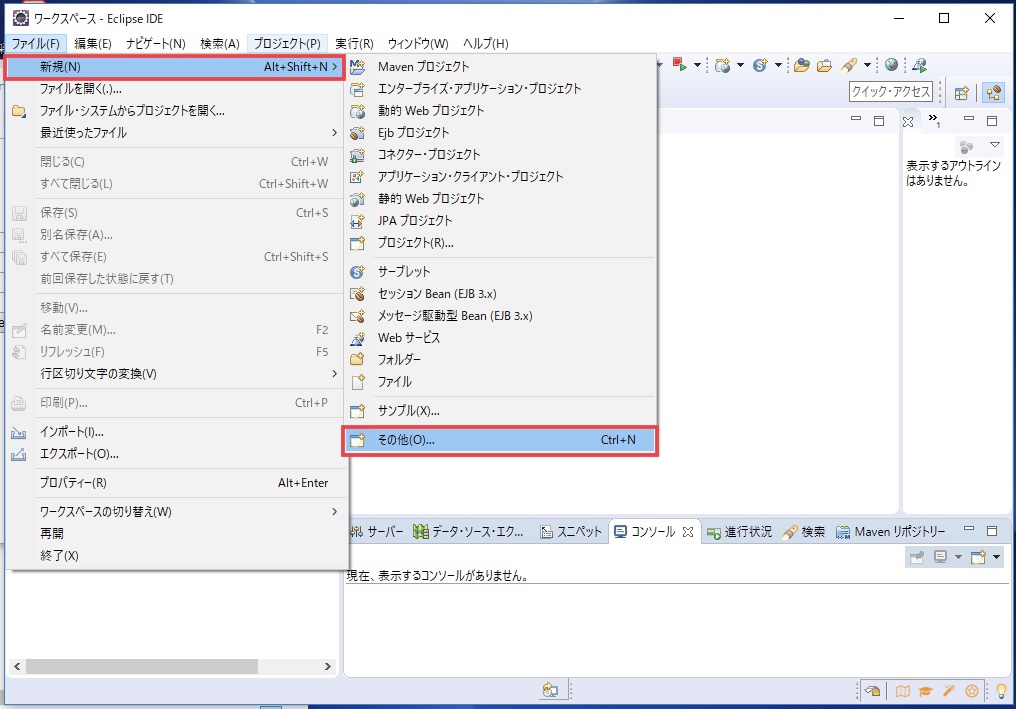
「ファイル」>「新規」>「その他」を選択します。「ウィザードを選択」画面で、「Spring 入門コンテンツのインポート」を選択して、「次へ」ボタンをクリックします。「入門コンテンツのインポート」画面で、該当する入門コンテンツを選択して、インポートします。


フォーム送信処理 - Handling Form Submission
この入門コンテンツでは、
SpringでWebフォームの作成と送信する方法を学習します。
インポート
「入門コンテンツのインポート」画面で「Handling Form Submission」を選択して、「完了」ボタンをクリックして、インポートします。


・ビルドタイプ
Mavenを選択
・コードセット
初期、起動にチェック
初期:プロジェクト「gs-handling-form-submission-initial」をインポート
起動:プロジェクト「gs-handling-form-submission-complete」をインポート
*この記事では、プロジェクト「gs-handling-form-submission-complete」について、紹介します。
Spring Boot アプリケーションの起動
「gs-handling-form-submission-complete」を右クリックして、「実行」>「Spring Boot App」を選択します。

コンソールに以下の情報が出力されていることを確認して、Spring Boot アプリケーションが起動したことを確認します。
・出力情報
yyyy-MM-dd hh:mm:ss.SSS INFO NNNN --- [ main] hello.Application : Starting Application...
...
yyyy-MM-dd hh:mm:ss.SSS INFO NNNN --- [ main] hello.Application : Started Application in NN.NNN seconds (JVM running for NN.NNN)
画面操作
Spring Boot アプリケーション起動後、ブラウザで「http://localhost:8080/greeting」にアクセスすると、送信画面が表示されます。送信画面でフォーム情報を入力して、「Submit」ボタンをクリックすると、送信画面で入力したフォーム情報が結果画面に表示されます。


・送信画面
「Submit」ボタン:フォーム情報を送信して、結果画面に表示します。
「Reset」ボタン:フォーム情報を初期表示時の値にリセットします。
・結果画面
「Submit another message」リンク:送信画面に戻ります。
コントローラ(Controller)
・コントローラクラス
GreetingController.java
・ソースコード
package hello;

import org.springframework.stereotype.Controller;
import org.springframework.ui.Model;
import org.springframework.web.bind.annotation.GetMapping;
import org.springframework.web.bind.annotation.ModelAttribute;
import org.springframework.web.bind.annotation.PostMapping;

@Controller
public class GreetingController {

    @GetMapping("/greeting")
    public String greetingForm(Model model) {
        model.addAttribute("greeting", new Greeting());
        return "greeting";
    }

    @PostMapping("/greeting")
    public String greetingSubmit(@ModelAttribute Greeting greeting) {
        return "result";
    }

}
GreetingControllerクラスは、コントローラクラスとして動作します。
・greetingFormメソッド
パラメータ:model(Modelクラス)
戻り値:ビュー名(送信画面 *templates配下の「greeting.html」)
ブラウザで「http://localhost:8080/greeting」にアクセスすると、このメソッドが実行されます。
ModelにGreetingクラスのオブジェクトをセットして、遷移先のビュー名を返します。Modelにセットした情報は、遷移先のビューで利用します。
・greetingFormメソッド
パラメータ:greeting(Greetingクラス)戻り値:ビュー名(結果画面 *templates配下の「result.html」)
送信画面(greeting.html)で「submit」ボタンをクリックすると、このメソッドが実行されます。
自動でGreetingクラスの変数に送信画面からのリクエストパラメータをセット、ModelにGreetingクラスのオブジェクトをセットして、遷移先のビュー名を返します。Modelにセットした情報は、遷移先のビューで利用します。
・アノテーションについて
@Controller:コントローラクラスに付与するアノテーション
@GetMapping:メソッドとGETリスエストURLを紐付けるアノテーション
@PostMapping:メソッドとPOSTリスエストURLを紐付けるアノテーション
@ModelAttribute:指定したクラスにリクエストパラメータをバインドするアノテーション
*クラスの変数に同名のパラメータを自動でセット
*バインドされたクラスは自動でModelにセット
フォーム(Form)
・フォームクラス
Greeting.java
・ソースコード
package hello;

public class Greeting {

    private long id;
    private String content;

    public long getId() {
        return id;
    }

    public void setId(long id) {
        this.id = id;
    }

    public String getContent() {
        return content;
    }

    public void setContent(String content) {
        this.content = content;
    }

}
ビュー(View)
この入門コンテンツでは、テンプレートエンジンにThymeleafを使用しています。
・送信画面
・送信画面
<!DOCTYPE HTML>
<html xmlns:th="http://www.thymeleaf.org">
<head>
    <title>Getting Started: Handling Form Submission</title>
    <meta http-equiv="Content-Type" content="text/html; charset=UTF-8" />
</head>
<body>
    <h1>Form</h1>
    <form action="#" th:action="@{/greeting}" th:object="${greeting}" method="post">
        <p>Id: <input type="text" th:field="*{id}" /></p>
        <p>Message: <input type="text" th:field="*{content}" /></p>
        <p><input type="submit" value="Submit" /> <input type="reset" value="Reset" /></p>
    </form>
</body>
</html>
・th:action="@{/greeting}"
action属性に「/greeting」を指定します。
・th:object="${greeting}"
Greetingクラスのオブジェクトを宣言します。
宣言したタグ内にて、下記のth:fieldのように、${greeting.id}、${greeting.content}ではなく、*{id}、*{content}で記述することができます。
・th:field="*{id}"
id属性とname属性に「id」(Greetingクラスの変数名)、value属性にGreetingクラスの変数idの値を指定します。
・th:field="*{content}"
th:field="*{id}"と同様にGreetingクラスの変数contentの情報を指定します。
・結果画面
<!DOCTYPE HTML>
<html xmlns:th="http://www.thymeleaf.org">
<head>
    <title>Getting Started: Handling Form Submission</title>
    <meta http-equiv="Content-Type" content="text/html; charset=UTF-8" />
</head>
<body>
    <h1>Result</h1>
    <p th:text="'id: ' + ${greeting.id}" />
    <p th:text="'content: ' + ${greeting.content}" />
    <a href="/greeting">Submit another message</a>
</body>
</html>
・th:text="'id: ' + ${greeting.id}"
タグ内のテキストに「id: 」+Greetingクラスの変数idの値を指定します。
・th:text="'content: ' + ${greeting.content}"
タグ内のテキストに「content: 」+Greetingクラスの変数contentの値を指定します。
スポンサーリンク
0 件のコメント :
コメントを投稿